Wednesday 15 February 2012

0 [Blogger] How to add subsribe widget with RSS,Facebook,Twitter, and Email Subscription [Tricks][Customize ]

 
Wasup buddies. This is one of my favorite placement of social bookmarking buttons i.e beside Adsense ad unit. I previously post Add 'AddThis' Social Bookmarking Buttons Below Each Blogger Post. But i believe the trick today that i am sharing is pretty professional looking and uses up the empty place at the right of Adsense ad.

Lets see how we can add this widget to our blog. Note that i will be showing the complete widget with Adsense placement with social bookmarking buttons.

Step 1: (Make a new ad Unit)

First make your self a new Adsense ad unit with dimensions (300x250) and Convert it so that it can be used in blogger template. Save the code with your self in notepad or any other program. We will add that code later in our widget.

Step 2: (Placing code 1)

Go to Design >> Edit HTML and tick the check box. Do download the template for backup purposes in case you want to restore to original position.

Now search for the following code.

]]></b:skin>
Once you find it, paste the following code just above it.

.ads{margin-bottom:10px; border-top:solid 1px #DEDEDE; padding-top:10px; font-size:13px;}
.ads-right-min{border-left:solid 1px #DEDEDE; height:250px; padding-left:10px;}
.ads-right-min a:link,
.ads-right-min a:visited,
.bottom-share-links a:link,
.bottom-share-links a:visited{
font-size:12px;
color:#222;
display:block;
height:22px;
line-height:22px;
margin-bottom:16px;
padding-left:32px;
}
.ads-right-min a:hover,
.bottom-share-links a:hover{color:#666;}
.mini-tech{background:url(http://lh6.ggpht.com/_TqPdHmAEwTM/SrVsIDBoz7I/AAAAAAAAFqw/UpGK_0UQUZg/technorati.gif) no-repeat;}
.mini-facebook{background:url(
http://lh4.ggpht.com/_TqPdHmAEwTM/SrXQ3G_uRnI/AAAAAAAAFq0/ktY0xwRy4Oo/fb.gif
) no-repeat;}
.mini-tweet{background:url(
http://lh5.ggpht.com/_TqPdHmAEwTM/SrVkkLNvMlI/AAAAAAAAFqs/S-UYpTlrZa8/tweet.gif) no-repeat;}
.mini-del{background:url(https://blogger.googleusercontent.com/img/b/R29vZ2xl/AVvXsEgVkyMFX3w-dGDfU0suQfUl2ZPsa_EQns35IXqwBK9-_zYWuLZZJ_qbaWl9yEMK842RXWuO4Q3RmToEZaAK20_Pn3BwoytwqRsX3ZHbP7ioz0Z6dBlZRS0REYDy2bduLwqzsJOxseeX6hU/s800/delicious_icon.jpg) no-repeat;}
.mini-stumble{background:url(
https://blogger.googleusercontent.com/img/b/R29vZ2xl/AVvXsEi19s4PK7bkLmSNH9KEX10OVto5fxo7jL1WtqGBPtfMuXac1ROIjyLfI9ulT75_gYFe1zQ19Y61S3gw3MU9UzxPGQBxB_0a5umV-xjqoyQk2oWyqRG9vil6laI5bpdw94SpvVPtxrqzI7Q/s800/stumbleupon%20icon.png) no-repeat;}
.mini-digg{background:url(https://blogger.googleusercontent.com/img/b/R29vZ2xl/AVvXsEiQgYMnCltM5S5mHX6Wt1oQRRntZLRGQB6MbWlVnK-W17v1qzZD9_sftAdRGFl8-T-8u2_NUOcTi6OVANA6IkeezabiNBpHdemFuyfxQbrSvglLlHEqf7aEbg1EsOcAaJ0gAOsAGG89Jqg/s800/Digg_icon.png) no-repeat;}
.flt-wdt{
position:fixed;
margin-right:10px;
left:0;
top:40%;
}
.flt-wdt img{
float:left;
clear:left;
margin:5px;
-webkit-transition: all .2s ease-in-out;
-moz-transition: all .2s ease-in-out;
-o-transition: all .2s ease-in-out;
transition: all .2s ease-in-out;
}
.flt-wdt img:hover{


Step 3: (Placing code 2)

Now search for the following code

<div class='post-header-line-1'/>
 Now just below the above code paste the following widget code.

/*** SSB Social Bookmarking Widget Beside Adsense Code START ***/
<b:if cond='data:blog.pageType == &quot;item&quot;'>
<div class='ads'>
<table border='0' cellpadding='0' cellspacing='0' width='100%'>
<tr>
<td width='354'>
YOUR ADSENSE CODE
</td>
<td><div class='ads-right-min'>
<a class='mini-del' expr:href='&quot;http://del.icio.us/post?url=&quot; + data:post.url + &quot;&amp;title=&quot; + data:post.title' target='_blank'
title='Add To Del.icio.us'>Add This To Del.icio.us</a>
<a class='mini-tweet' expr:href='&quot;http://twitter.com/home?status=Reading &quot; + data:post.title + &quot; &quot; + data:post.url' target='_blank'
title='Post this article on Twitter'>Tweet/ReTweet This</a>
<a class='mini-facebook' expr:href='&quot;http://www.facebook.com/sharer.php?u=&quot; + data:post.url + &quot;&amp;title=&quot; + data:post.title'
target='_blank' title='Share On Facebook'>Share on Facebook</a>
<a class='mini-stumble' expr:href='&quot;http://www.stumbleupon.com/refer.php?url=&quot; + data:post.url + &quot;&amp;title=&quot; + data:post.title'
target='_blank' title='Stumble This'>StumbleUpon This</a>
<a class='mini-tech' expr:href='&quot;http://www.technorati.com/faves?add=&quot; + data:post.url' target='_blank' title='Add To Technorati'>Add to
Technorati</a>
<a class='mini-digg' expr:href='&quot;http://digg.com/submit?phase=2&amp;url=&quot; + data:post.url + &quot;&amp;title=&quot; + data:post.title'
target='_blank' title='Digg This'>Digg This</a>
</div>
</td>
</tr>
</table>
</div>
</b:if>
/*** SSB Social Bookmarking Widget Beside Adsense Code END***/
Replace the text  YOUR ADSENSE CODE with your Adsense converted code.


That's all! Now finally click save template. Hope you liked the widget as i liked it. Share you views about it in the comment section below :)

0 [Blogger] How to Cuztomize Flooting Share Button [Tricks]


Ever wondered to create a Mashable type floating sharing widget for your blogger blogs? There you have it today! We released a sliding, scrolling widget last month which contained major social media sharing buttons but some of you complained that the widget do not work properly with the new blogger templates so to keep things more flexible, we are releasing yet another version of a floating widget which contains the best social buttons like Facebook Share/like, Twitter and Google +1 button. All in one. I have not used any scripts this time and this widget works purely on CSS and HTML and is fully compatible with all major browsers. You can see this sticky widget to left of my blog post. I have made sure to keep the installation process as easy as possible so be confident to try this one out to better increase your social engagement and thereby your page views.

Adding The Sticky Floating Widget Next To Blogger Posts


  1. Go To Blogger > Design
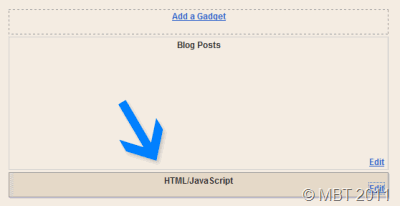
  2. Choose a HTML/JavaScript widget
  3. Paste the following code inside it,


CODE:
<style>
/*-------SSB Floating Sharing Widget------------*/

#floatdiv {
  position:fixed;
bottom:15%;
margin-left:-250px;
z-index:10;
float:left;
padding-bottom:2px;

}

#mbtsidebar {
        background:#fff;
        border-top:1px solid #ddd;
        border-left:1px solid #ddd;
        border-bottom:1px solid #ddd;
        border-radius:5px;
       -moz-border-radius:5px;
       -webkit-border-radius:5px;
        padding-left:5px;
        width:60px;
        margin:0 0 0 5px;
}

.fb_share_count_top {width:52px !important;}

.fb_share_count_top, .fb_share_count_inner {-moz-border-radius:3px;-webkit-border-radius:3px;}

.FBConnectButton_Small, .FBConnectButton_RTL_Small {width:52px !important; -moz-border-radius:3px;/*bs-fsmsb*/-webkit-border-radius:3px;}

.FBConnectButton_Small .FBConnectButton_Text {padding:2px 2px 3px !important;-moz-border-radius:3px;-webkit-border-radius:3px;font-size:8px;}
</style>


<div id="floatdiv">
<div id="mbtsidebar">
    <table cellpadding="1px" cellspacing="0">


    <tr>
    <td style="padding:5px 0px 0px 0;">
<a href="http://twitter.com/share" class="twitter-share-button" data-count="vertical" data-via="ndreamtech">Tweet</a><script type="text/javascript" src="http://platform.twitter.com/widgets.js"></script>
    </td>
    </tr>

    <tr>
    <td style="padding:5px 0 2px 0;">
    <a name="fb_share" type="box_count" href="http://www.facebook.com/sharer.php">Share</a><script src="http://static.ak.fbcdn.net/connect.php/js/FB.Share" type="text/javascript"></script>
    </td>
    </tr>
    <tr>
    <td style=" padding:5px 0px 0px 0px;">

<script src='http://apis.google.com/js/plusone.js' type='text/javascript'> {lang: &#39;en-US&#39;} </script>

<g:plusone size="Tall" expr:href="data:post.url">
    </g:plusone></td>
    </tr>
    <tr>
    <td>
<p style=" line-height:0px; font-size:10px; font-weight:bold; text-align:center;"><a style="color:#D3D3D3;" href="http://shahzaibbaig.blogspot.com/2012/02/blogger-how-to-cuztomize-flooting-share.html">Widgets</a></p>
    </td>
    </tr>
    </table>
</div>
</div>


     4.   Save your widget and drag it just below the post body as shown below,
floating-widget
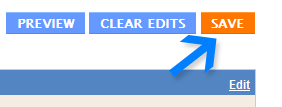
      5.   Now finally Click the save button at the top right corner and you are all done!
save-button
View your blog to see it hanging just to the left of your blog post body.

Tuesday 14 February 2012

0 [Photoshop] How to Make Animated Banner or Image

Photobucket
First select size , i am choosing 468x60 banner.

Now Click Window > Animation , to enable the animation box

In FIG1, you see layer and eyes , eye is an important tool which can use when you click new frame in FIG2 , the eye help you to show which content is to be shown in 2nd  frame, like this

In this picture eye tool with the help of frame in animation box help us to make animation ,

PROJECT
Uploading.com

EXAMPLE

Photobucket

0 [EBOOK] Software Engineering PDF [FREEBIES]


List Of Files
Chapter 1 - Introduction.pdf
Chapter 2 - Development.pdf
Chapter 3 - RE-1.pdf
Chapter 3 - RE-2.pdf
Chapter 3 - RE-3.pdf
Chapter 3 - RE.pdf
Chapter 4 - Domain Models.pdf
Chapter 5 - GUIPrototype.pdf
Chapter 6 - Sw Design.pdf
Chapter 7 - OOA and OOD.pdf
Chapter 8 - SW Archi.pdf
Chapter 9 - Design Pattern.pdf
Chapter 10 - GoodProgPrac.pdf
Chapter 11 - Sw V & V.pdf
Chapter 12 - Debugging.pdf

Downloads
Uploading.com

0 GW-BASIC [INPUT STATEMENT]

INPUT STATEMENT is use when  you don't know the value , which should be input, like you have to make a BIO-DATA for 32 Students you  don't make different Program, you can just make a program with INPUT statement ,
FOR EXAMPLE
10 CLS
20 INPUT "ENTER YOUR NAME";N$
30 INPUT "ENTER YOUR FATHER NAME ";F$
40 INPUT "ENTER YOUR CLASS";C$
50 INPUT "ENTER YOUR AGE";A
60 CLS
70 PRINT "NAME:";N$
80 PRINT "FATHER NAME:";F$
90 PRINT "CLASS:";C$
100 PRINT  "AGE";A
110 END
When You run this , The Screen show you
ENTER YOUR NAME? SHAHZAIBBAIG
ENTER YOUR FATHER NAME? NAIR
ENTER YOUR CLASS? 9TH
ENTER YOUR AGE? 15
When You Enter the Name ,Father name, class and age
the result will be
NAME:SHAHZAIBBAIG
FATHER NAME:NASIR
CLASS:9TH
AGE :15
every time you run , this message will appear every time, if you don't use PRINT statement the result will not shown, so PRINT is an important , always remember that String[Alphanumeric] DATA will written with Quotation mark and Numeric data without Quotation Mark, 

3 GW-BASIC [FOR-NEXT STATEMENT]

In GW-BASIC FOR-NEXT is use for looping , you can print any number more than 1 time easily .
how to write FOR-NEXT
10 FOR A=1 TO 10
20 PRINT SHAHZAIBBAIG
30 NEXT A
Where A is a variable , 1 TO 10 this will PRINT SHAHZAIBBAIG 10 times, you can PRINT more than ten time, its is useful and short STATEMENT of GW-BASIC , NEXT Command is must if u donot write at the end the loop will not work and give you syntax error.

Some Examples
10 FOR A = 3 TO 28 STEP 5
20 PRINT A
30 NEXT A
Where STEP 5 will PRINT Like this 3 then 8 then 13 then 18 ....

You Can also do this
10 FOR A= 28 TO 3 STEP -5
20 PRINT A
30 NEXT A
This will minus 5 from 28 , when 3 comes program will stop


Monday 13 February 2012

0 GW-BASIC [PRINT STATEMENT]

PRINT means to print any data consist of numeric and alphabets .
In GW-BASIC , we use print instead of echo it is simple and easy.
PRINT "Your Name"
PRINT 23-23
PRINT 1

QUOTATION marks are use in string [alphanumeric] data
You can write Numeric data with out QUOTATION mark ,
Share

Widgets

 
Design by Shahzaib Baig